
Despite the fact that I’ve been making our bread for a while now, I haven’t been 100% thrilled with it. It seemed almost impossible to achieve that soft textured, (and beautifully rounded) sandwich bread at home.
I imagined that it was some secret ingredient only a baker would know or a method that the bakeries weren’t sharing. I’ve seen ingredient lists in the past that included additional gluten and I’ve avoided them, assuming that it was just one more ingredient to buy and surely it couldn’t be required.
Well, I’m telling you now that the additional gluten made a world of difference. I imagine that I will still be trying to create these loaves without it periodically in the future, but for the time-being, this is truly sandwich quality bread!
I found a fantastic guide, complete with step by step instructions and pictures at Green Bean Gardens. (sigh, sorry friends, that blog is no long active. The link I shared years ago is a broken one.)
If you are new to bread making or still struggling (like I often do) with getting the consistency correct or making sure you don’t wind up with a dense brick of bread, read through her instructions and check out the pictures for even more help.
The instructions below are written for a kitchenaid mixer, if you don’t have one, you can still do all the steps by hand. Since the original blog where I found this recipe is no longer available, I’ll try to snap some photos of the process next time I make it.

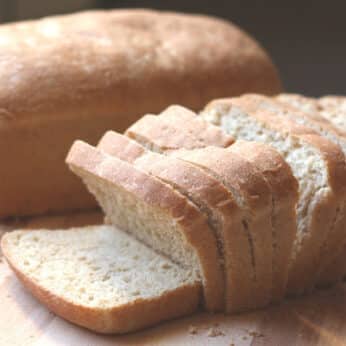
Beautiful Whole Wheat Sandwich Bread
Ingredients
- 1 2/3 cup water warmed to about 120 degrees
- 2/3 cup milk warmed to about 120 degrees
- 1/4 cup butter melted
- 1 teaspoon kosher salt
- 1/4 cup honey plus 1 tablespoon divided
- 1 tablespoon yeast
- 3 cups whole wheat flour I used freshly ground hard white wheat
- 2 - 3 cups all-purpose flour I used 2 ¾ cups + an additional ½ cup, see note below
- 3 tablespoons wheat gluten
Instructions
- In your mixing bowl, combine the ¼ cup honey, warm milk, melted butter and salt. Add one cup of the warm water to this mixture and whisk to combine. In a small glass bowl or cup, combine 2/3 cup warm water, yeast and the last tablespoon of honey. Stir or whisk until the yeast is mostly dissolved. Let this yeast mixture rest about 5 minutes, or until it is bubbly.
- Add the wheat flour, 1 cup of AP flour and the wheat gluten to the mixing bowl. Stir briefly to combine and then add in the yeast mixture. Beat until combined and then continue beating the liquid dough for another couple of minutes. (This allows the gluten in the flours to start getting elastic, which creates a much smoother textured loaf.) After two minutes, add in 1 more cup of AP flour and mix to combine. (My dough was still very liquid at this point, so I added an additional ½ cup of flour to get the dough to a consistency I could dump out onto the counter.)
- Generously flour a countertop (I spread ½ cup of flour across the countertop) and begin kneading the dough. Basically, just flip the dough in half repeatedly, pressing down with the heel of your hand. Knead the dough for 5 minutes, adding just a little bit more AP flour at a time (only if necessary - I added ¼ cup more AP flour total) if the dough is sticking to your hands or the counter. Per Jill's instructions, "The key here is to add enough flour to keep the dough from sticking, but not enough to make the dough stiff. The dough should be soft, supple and smooth without being overly sticky. Err on the side of sticky, not dry. Too much flour during the kneading process will result in dry bread." Perfectly stated and for the first time ever, that is what I achieved! I think finishing the kneading process by hand is the key here.
- Place the kneaded dough back in the bowl, cover with a towel and allow it to rise in a warm place for about 1 hour. It should double in size. Punch the dough down again and turn it out on a lightly floured countertop. Divide the dough in half and gently shape one portion into a rectangle. I used a rolling pin to smooth it out just a bit and to remove air bubbles. Starting at the end closest to you, start tightly rolling the dough into a cylinder, the same way you would roll a sleeping bag. Poke the ends toward the middle as you roll, to help keep it's shape. (Again, look at Jill's original post here for step by step pictures) Once the bread is rolled, place it in a well greased bread pan and repeat with the other half of the dough. Allow the loaves to rise in a warm place (I kept mine on the stove) for 30-40 minutes, or until they are about an inch or so above the top of the pans. Check your dough as it is rising, if the kitchen is very warm, it might rise faster. If it rises too much, it will collapse and flattens on top. This will cause the bread to be dry. I let mine rise just a bit too much and it started to flatten. I'll watch it closer next time. I caught it before it collapsed, so it still tasted delicious though!
- Preheat the oven to 365 degrees, once the loaves have been rising about 20 minutes. Place the bread in the oven once it is heated. Bake for 20-25 minutes or until the loaves are golden brown and sound hollow when you tap them. Remove from the oven and immediately turn the loaves out onto a cooling rack. Allow to cool completely before slicing.
- FREEZER TIPS: I froze one loaf, wrapped well in aluminum foil. I sliced the other one the same day we made it. The frozen loaf thawed perfectly and sliced just as well a few days later.


Carrie says
This looks so good Mary! I will have to see if I can find some wheat gluten.
Allison at Novice Life says
Hmmm, so is wheat gluten something I can pick up at the grocery store? I am trying to find a recipe we can use for sandwiches because I am so tired of the plastic bagged bread from the store with 900 ingredients!
The Slow Roasted Italian says
Your bread looks beautiful Miss Mary! I may give this one a shot.
Big Dude says
It does look very good. Bev goes through phases with bread baking and is currently in the off mode – in part because it's not conducive to trying to our weight loss efforts.
Sue/the view from great island says
All I can say is wow. I'm amazed that any homemade bread could look like that. I'm amazed that it looks so light even with all that whole wheat in it. I'm also amazed that you could slice it so perfectly. Great photo, too.
due bionde in cucina says
Hello Mary, how are you??? Very very good bread for sandwiches and breakfast.
Smack
Sabina
My Journey With Candida says
The bread looks GREAT!!! Looks like you bought it instead of making it yourself.
SixBalloons says
That looks really great. Your kitchen must have smelled delightful!
Beth says
It certainly worked this time, as that's a glorious-looking loaf of bread. Well done!
Chris says
I sear I can almost smell the "fresh baked" aroma coming from my computer.
Words Of Deliciousness says
Your bread does look beautiful. Nothing beats the taste of homemade bread!
Velva says
Your loaves of whole wheat bread are beautiful. Glad that you found your stride in bread making. I still shy away from the process.
Happy Thanksgiving to you and your family.
Velva
Tricia @ saving room for dessert says
Beautiful is a great name for this bread. You have perfected whole wheat bread!
Erin @ Cooking on Whim says
Thanks for the tips! I have the same issues as you, usually. I, too, am working on the perfect bread! This one looks fantastic.
Mary says
Wheat gluten can be bought at health food stores. I'm honestly still torn about adding it. It certainly gave the bread an incredible rise and texture. At the same time though, we have been trying to cut back on the gluten products in most of our meals. I suppose for the occasional loaf of gorgeous bread, it is well worth it!
Mallory says
Awesome name, it is beautiful indeed!
Veronica H says
Hi Mary,
I can never slice my bread that thin. What do you use to slice the bread?
Veronica
Mary says
I have a simple bread knife, long and thin with a serrated edge. I've heard of people using an electric knife as well, but I'm not that fancy. Good luck!
Shawna says
Mine's in the oven right now and it's looking GORGEOUS! I'm so excited. This is my first wheat bread recipe I've tried and my first bread using added gluten so I'm happy it seems to be going well. 🙂 I did have to sub in sugar for honey as I found out a little late that I'm out of honey. Otherwise I followed your instructions exactly! Oh, only I used red wheat instead of white.
Shawna says
Me again. 🙂 My first two loaves came out amazing. I made them again today and they're cooling on the counter. I got adventurous and subbed one of the cups of AP for another cup of wheat and I'm hoping it comes out just as delicious. Thanks for this great recipe!